
Introduction
The MyUser API is organized around REST. Our API has predictable resource-oriented URLs, accepts form-encoded request bodies, returns JSON-encoded responses, and uses standard HTTP response codes, authentication, and verbs.
You can use the MyUser API in test mode, which does not affect your live data. The API key you use to authenticate the request determines whether the request is the live mode or test mode.
Base URLhttps://api.myuser.com/pay/v1
--{Javascript Library}--
<script src="https://api.myuser.com/js/checkout.js"></script>
Setup
Library Installation
*compile*
Download <a target="_blank" href="https://github.com/myuserHQ/myuserpay-php/" style="color: #0099e5;text-decoration: none;border: none;">php library</a> from here <a href="https://github.com/myuserHQ/myuserpay-php/archive/main.zip" target="_blank" style="
    background: #0f75d4;
    border: none;
    padding: 4px 14px;
    border-radius: 3px;
">Download</a>
npm i myuserpay --save
API libraries
Official libraries for the MyUser API are available in several languages.
To setup you need to do just 4 things:
- Sign up to get API Keys from here
- Finish all steps in dashboard
- Install Library of your preferred language
- Copy Paste 2 blocks of codes from this documentation.
Official libraries for the MyUser API are available in several languages.
You can install our libraries via codes or from links below:
JavaScript (Node.js):
https://github.com/myuserHQ/myuserpay-node/archive/master.zip
PHP:
https://github.com/myuserHQ/myuserpay-php/archive/master.zip
Authentication
--{Authenticated Request}--
$ curl https://api.myuser.com/pay/v1/balance \
  -u your_private_key:
	# The colon prevents curl from asking for a password.
--{Authenticated Request}--
<?php
use \MyUser\MyUserPay;
include 'MyUserPay/init.php'; //path/to/MyUserPay library
MyUserPay::setPrivateKey('your_private_key');
--{Authenticated Request}--
const myuserpay = require('./myuserpay')('your_private_key');
--{Authenticating in Front-End using script tag}--
<script src="https://api.myuser.com/js/checkout.js"
data-public_key="your_public_key"></script>
--{Authenticating in Front-End using Javascript}--
<script type="text/javascript">
MyUserPay.setKey('your_public_key');
</script>
The MyUser API uses API keys to authenticate requests. You can view and manage your API keys in the MyUser Dashboard.
Test mode secret keys have the prefix sk_test_, public keys have the prefix pk_test_, and live mode secret keys have the prefix sk_live_, public keys have the prefix pk_live_.
Your API keys carry many privileges, so be sure to keep them secure! Do not share your secret API keys in publicly accessible areas such as GitHub, client-side code, and so forth.
Authentication to the API is performed via HTTP Basic Auth. Provide your API key as the basic auth username value. You do not need to provide a password.
Errors
Example error response:
{
"status":false,
"error":{
	"message":"Description of error"
	}
}
Handling errors in libraries (please check library):
--{Error Handling}--
<?php
//any library function, process will contain json
$process = MyUserPay::get_balance(); //any library function
if($process['status']){
	//success
}else{
	//error
	echo $process['error']['message'];
}
--{Error Handling}--
//any library function, process will contain json
const res =  myuserpay.get_balance().then(function (response) {
   if(response.status){
     //success
   }else{
	 //error
     console.log(response.error.message);
   }
});
The MyUser API always returns json object, and inside of it, there always will be status variable. If status is not true, please check the error object: "error":{"message":"Description of error"}. You can use this object to show the error. This is true for both backend and frontend codes/errors.
Myuser Link
Myuser link is used to accept Zelle, Wire, ACH Push, Fednow payment methods. To accept card payments via traditional card networks, please use other sections.
This solution is initiating real-time payments with many methods from end user's bank to your bank account and then automatically checks the status of payment and let you know the result (pending,failed,paid). By using this technology, you can accept Zelle, Wire, ACH Push, Fednow just like card payments and learn the result real-time.
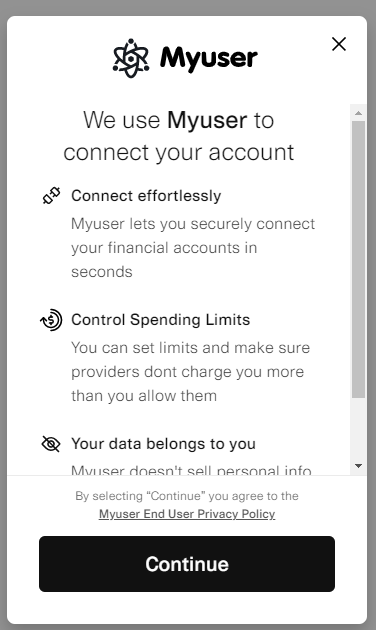
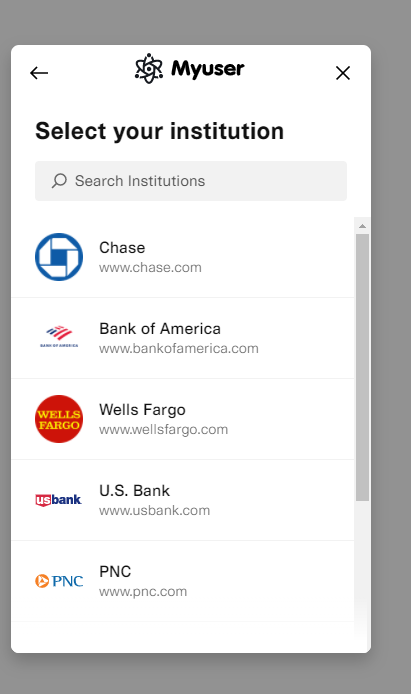
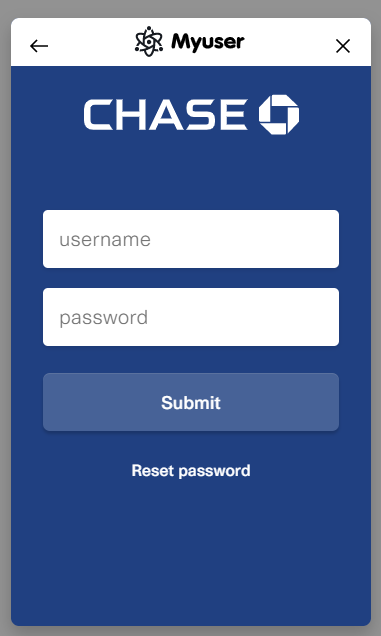
The way this works is you will need to obtain token via Myuser.createLink function in frontend and then use Charge function in backend to confirm the amount in backend. Then you will need to check in the response of charge function to see if payment has been sent by using paid attribute. If paid attribute is true, it means user's bank successfully paid you, if it is false, you will need to wait for charge.paid webhook which you can setup from dashboard with couple clicks. You can follow this section to easily implement Myuser Link from setup till your first payment.
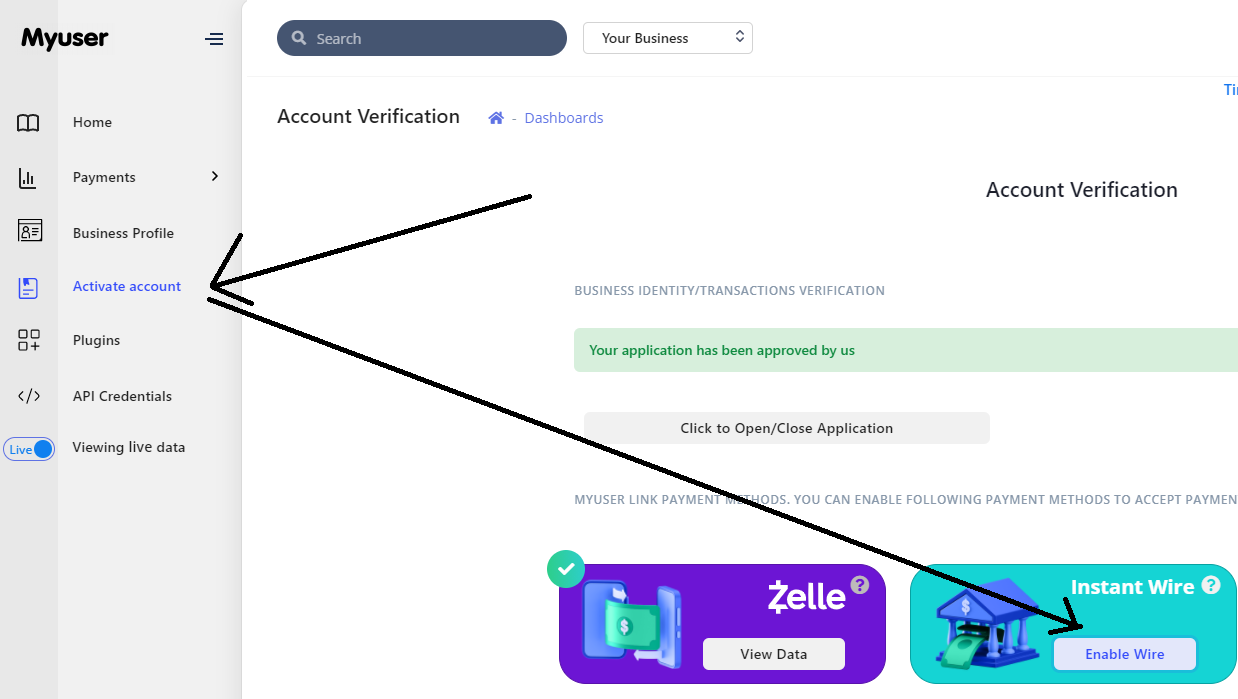
Activate Myuser Link
To activate Myuser Link, you will need to get approved from Myuser and then go to Activate Account section and click Enable for the payment method you want to enable, then fill out the details.
Function createLink in JS
Myuser.createLink is Javascript library function is used to create Financial link connection with user's bank and initiate payment to your bank account. It returns Myuser Link identifier which you can use for MyUserPay.openLink(myuser_financial_link_id). The purpose of this function is to get payment method token so you can use it on charge function
--{Initiate Myuser Link}--
<script type="text/javascript">
//make sure you include Myuser library
	MyUserPay.setKey('your_public_key');
	//charging $100
 var myuser_financial_link_id = MyUserPay.createLink({'amount':10000,'email':'[email protected]',
'payment_methods':['zelle','wire'],
onClose:function(data){
   console.log(data);
  },
onSuccess:function(data){
 if(data.status){
  //success
  //data.token is MyUserToken that you can use to process charges; Also identify when you receive webhooks
  }else{
  //error
  //you can receive error message using data.error.message, then show it to the user.
  }
 }
});
    // later you can use MyUserPay.openLink(myuser_financial_link_id) to show the modal where customers can login
</script>
MyUser.createLink() Parameters
| Parameters | Description | Required |
|---|---|---|
| amount | It shows how many cents you will charge user. (100 = $1.00). Please calculate your currency and convert it into cents. | true |
| Email of end user. This is required so that we can identify the user. | true | |
| destination | This shows the destination of the funds. Default is self | false |
| payment_methods | The list of the payment methods you would like to let user to pay you. Accepted values: ['zelle','wire','fednow']. Default is all available payment methods in your account | false |
| onClose(data){} | This is a callback if end user closes the Myuser Link manually by clicking close | false |
| onSuccess(data){} | This is a callback that will be triggered after we obtain payment method token. | true |
Function openLink in JS
Myuser.openLink is Javascript library function is used to show the Myuser Link Modal screen to end user. It accepts myuser_financial_link_id as first parameters and options object as second parameters
--{Open Myuser Link}--
<button
onclick="
event.preventDefault();
MyUserPay.openLink(myuser_financial_link_id,{email:[email protected]})"
>Pay</button>
| Parameters | Description | Required |
|---|---|---|
myuser_financial_link_id | You obtain this instantly after using Myuser.createLink() | true |
| options | This is option variable to change original options you passed on Myuser.createLink(). For now it only accepts {email:'[email protected]'} | false |
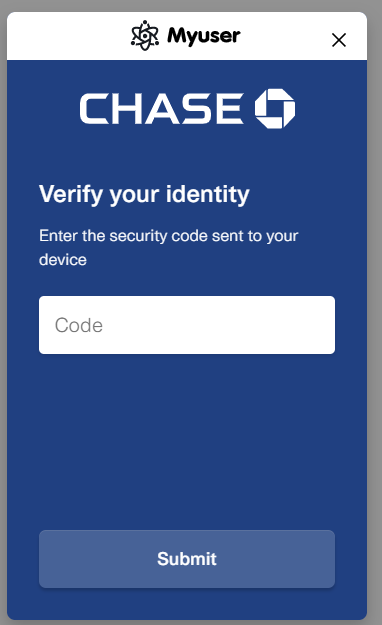
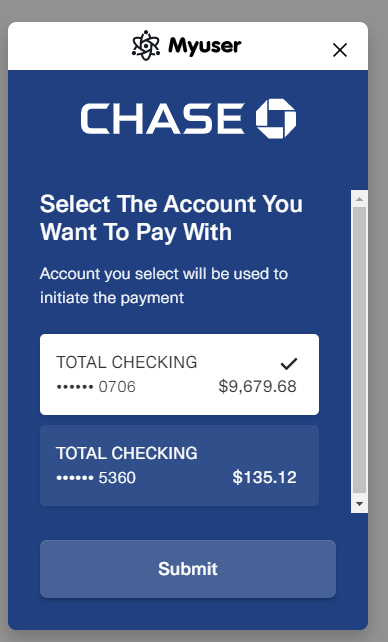
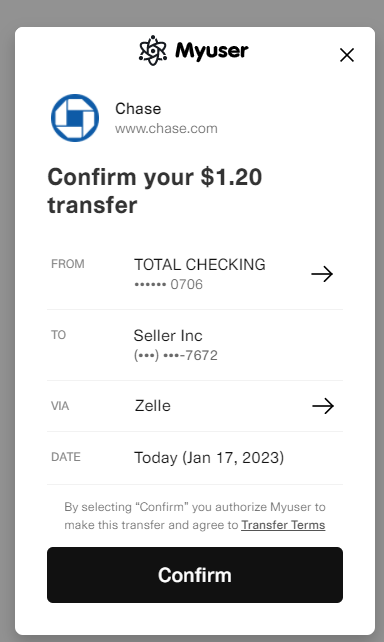
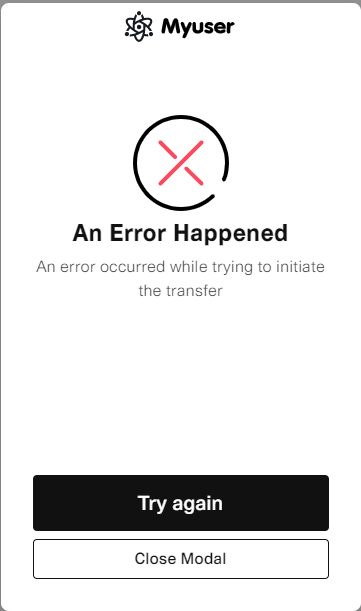
What does Myuser Link look like
Here are images showing what Myuser Link looks like when user clicks on them and after they pay

Confirm the charge in backend
After you have obtained the token, you can use it to identify status changes that comes from webhooks and also confirm the charge right away which helps you to make sure customer paid the correct amount. Please refer to Charges section to learn more. However, to make it easier you can look at the examples here.
--{Choose a library to see the examples}--
--{Handling Myuser Link charges/confirmation}--
<?php
use \MyUser\MyUserPay;
include 'MyUserPay/init.php'; //path/to/MyUserPay library
MyUserPay::setPrivateKey('your_private_key');

$MyUserToken='Replace-with-frontend-token';//This is data.token you retrieve from frontend
$process = MyUserPay::charge(
array(
'amount'=>10000,//make sure it matches with frontend
'token'=>$MyUserToken,
)
);
if($process['status']){
//success
$charge_id = $process['id'];//save it in db
if($process['paid']==true){
//user paid, continue fullfilling order
}else{
//user has not paid
//wait charge.paid webhook
}
}else{
//error
echo $process['error']['message'];
}
const myuserpay = require('./myuserpay')('your_private_key');
const MyUserToken='Replace-with-frontend-token';//This is data.token you retrieve from frontend

const res =  myuserpay.charge({
//If request was post, and request.body contains post data
token:MyUserToken,
amount:10000,//make sure it matches with frontend
}).then(function (response) {
   if(response.status){
	   //success
     console.log(response.id);
		 if(response.paid==true){
      //user paid, continue fullfilling order
     }else{
     //user has not paid
     //wait charge.paid webhook
    }
   }else{
	   //error
     console.log(response.error.message);
   }
});
Accept card payments
To be able to accept card payments you will need to be approved for it. By default you might not have access to card payments via traditional card networks and if you attemp to accept card payments Myuser will use Myuser Network instead of card network which will result in using Myuser Link.
If you are accepting card payment via card
Card payment flow is like the following:
- Authorize the card by obtaining Authorization Token with one of the 3 ways Direct Card Integration, Inline Integration, Payment Button
- Charge the token by using Charges
- Charges object will return status
true|false. If status isfalse, show the error, if status istrueit means transaction was successful. If successful, Charge object will also return paidtrue|false. Paid is alwaystruefor card payments unless Myuser Link is used. In the case you use Myuser Link you will need to wait for webhooks if paid isfalse
Authorizing the card will create a token that you must capture within 2 days otherwise it might expire. You will see these charges as uncaptured in Myuser dashboard until you either capture them manually from the dashboard or automatically via code by sending charge request.
Direct Card Integration
Instead of sending card details directly, we recommend using the Inline Integration to accept a payment immediately without your server touching the card details.
When you send card details directly unlike other integration types, you will need to handle 3ds separately, but will have the opportunity to save the card by tokenizing it. Tokenizing the card is different than obtaining authorization token. Authorization token is single use only to capture the card meanwhile tokenized cards can be used as many times as you like to use them.
Flow to obtain authorization token by using Direct Card Integration is like the following:
- Obtain Risk Session ID in front-end. This is highly recommended and by default required section. If you absolutely cannot do this then you will need to reach out to us and ask for disabling this requirement for your account.
- (optional) tokenize the card. This will give a secure token that you can use and save instead of saving the card itself
- sending /token request. If you have not tokenized the card, you will need to send all card details in this request. However, if you have tokenized the card you can send
secure_vault_tokenvariable instead. - using charge request
Create Risk Session
You will need to use Myuser javascript library and MyUserPay.createRiskSession to be able to accomplish this goal. You can ONLY create risk session in frontend. By default, if you use VPN, risk session will not be obtainable.
<script src="https://api.myuser.com/js/checkout.js"></script>

<script type="text/javascript">
var risk_session_id=null;
MyUserPay.setKey('your_public_key');
MyUserPay.createRiskSession(function(data){
if(data.status==1){
risk_session_id=data.id; //send it to us via server request using 'risk_session_id' variable
}


 },{'connection_token':'Yourconnection_tokenD'});
//you can pass ‘default’ instead of 'Yourconnection_tokenD' and Myuser will choose the first available stripe account to create risk sessionf

</script>
MyUserPay.createRiskSession()
createRiskSession accepts first variable callback function, and second variable as object to identify which processor to use to obtain the risk session for. connection_token you define here must match the connection_token in the backend otherwise it will not work.
| Parameters | Description | Required |
|---|---|---|
| function(data){} | callback function. If data.status is not false or 0 it means risk session has been obtained successfully | true |
| {'connection_token':'Yourconnection_tokenD'} | This is to identify which processor to use to obtain risk session. You can find connection_token in Myuser dashboard Activate Account section. connection_token you define here must match the connection_token in the backend otherwise it will not work. | true |
Tokenize cards - optional
This is optional section if you want to save the card for future usage.
--{Tokenize the card info}--
$ curl https://api.myuser.com/pay/v1/tokenize \
  -u your_private_key: # The colon prevents curl from asking for a password.
	-d "card[number]"="4242424242424242"
	-d "card[exp_year]"=22
	-d "card[exp_month]"=1
	-d "card[cvc]"=123
	-d "allow_all"=1
--{Tokenize the card info}--
<?php

$ch = curl_init();

$sent_data=array();


$sent_data['card']=array('number'=>'4242424242424242','exp_year'=>22,'exp_month'=>1,'cvc'=>'123');

/*
OPTIONAL BUT HIGHLY RECOMMENDED IF YOU DONT save those details on your database
$sent_data[‘customer_ip’]=’{CUSTOMER IP}’;
$sent_data[‘customer_user_agent’’]=’{CUSTOMER USER AGENT}’;
OPTIONAL TO MAKE THE TOKEN ACCESSIBLE ACROSS MULTIPLE MYUSER ACCOUNTS
$send[‘allow_all’]=1; => If you dont pass this variable you won’t be able to use tokens across multiple myuser accounts but if you pass anyone with the card token will have access to the card
*/

$gateway_private_key='your_private_key';

            curl_setopt($ch, CURLOPT_URL,'https://api.myuser.com/pay/v1/tokenize');
            curl_setopt($ch, CURLOPT_USERPWD, $gateway_private_key);
            curl_setopt($ch, CURLOPT_POST, 1);
            curl_setopt($ch, CURLOPT_POSTFIELDS, http_build_query($sent_data));
            curl_setopt($ch, CURLOPT_SSL_VERIFYHOST, 0);
            curl_setopt($ch, CURLOPT_SSL_VERIFYPEER, 0);
            curl_setopt($ch, CURLOPT_RETURNTRANSFER, true);
            $response = curl_exec($ch);
            curl_close ($ch);
$response_json=json_decode($response,true);

if($response_json['status']){
  echo'successfully tokenized';
//CARD TOKEN:  $response_json['secure_vault_token'];
//Now you can send this secure_vault_token to /token endpoint as $send[‘secure_vault_token’] instead of $send[‘card’]
}else{
  echo'error:'.$response_json['error']['message'];
}
var request = require('request');

var headers = {
    'Content-Type': 'application/x-www-form-urlencoded'
};

var dataString = 'card[number]=4242424242424242&card[exp_year]=22&card[exp_month]=1&card[cvc]=123&allow_all=1';

var options = {
    url: 'https://api.myuser.com/pay/v1/tokenize',
    method: 'POST',
    headers: headers,
    body: dataString,
    auth: {
        'user': 'your_private_key',
        'pass': ''
    }
};

function callback(error, response, body) {
    if (!error && response.statusCode == 200) {
        console.log(body);
    }
}

request(options, callback);
/tokenize endpoint Parameters
| Parameters | Description | Required |
|---|---|---|
| card[number] | Card number that will be tokenized | true |
| card[exp_year] | Card expiration year | true |
| card[exp_month] | Card expiration month | true |
| card[cvc] | Card security code that we will use to send in first transaction related to this card | true |
| customer_ip | Ip of the end user | false |
| customer_user_agent | Browser user agent of the end user | false |
| billing_details[address_country] | Billing country of the end user | false |
| billing_details[address_line1] | Billing street address of the end user | false |
| billing_details[address_line2] | Billing address line 2 of the end user | false |
| billing_details[address_city] | Billing city of the end user | false |
| billing_details[address_postcode] | Billing postalcode of the end user | false |
| billing_details[address_state] | Billing state of the end user | false |
| billing_details[email] | Billing email of the end user | false |
| billing_details[phone] | Billing phone of the end user | false |
| billing_details[firstname] | Billing firstname of the end user | false |
| billing_details[lastname] | Billing lastname of the end user | false |
Create Token via Direct Card Integration
We will be using /token endpoint to obtain Authorization token to be able to use it with Charge function later on. /token is authorizing the card instead of tokenizing it. If you need to tokenize the card use /tokenize endpoint.
--{Authorizing Card}--
$ curl https://api.myuser.com/pay/v1/token \
  -u your_private_key: # The colon prevents curl from asking for a password.
	-d "card[number]"="4242424242424242"
	-d "card[exp_year]"=22
	-d "card[exp_month]"=1
	-d "card[cvc]"=123
	-d "risk_session_id"="rs_example"
	-d amount=1000
	-d "currency"="usd"
	-d "customer_ip"="106.235.43.24"
	-d "billing_details[address_country]"="United States"
  -d "billing_details[address_line1]"="1410 Market Street"
  -d "billing_details[address_line2]"=""
  -d "billing_details[address_city]"="San Francisco"
  -d "billing_details[address_postcode]"="94111"
  -d "billing_details[address_state]"="CA"
  -d "billing_details[email]"="test@example"
  -d "billing_details[firstname]"="Jake"
  -d "billing_details[lastname]"="Musk"
	-d "connection_token"="3a1_asdasiqwenqsasodasd"
<?php

$ch = curl_init();
$charge_amount=1000;
$charge_currency='usd'; //DEFINE CURRENCY HERE
$sent_data=array(
  'amount'=>$charge_amount,'save'=>true,
'currency'=>$charge_currency, //Currency Passed here and also will be passed in charge function below
'customer_ip'=>127.0. 0.1 //IMPORTANT TO SEND CUSTOMER IP
);
$sent_data['risk_session_id']='rs_xxxx'; //you get this from Javascript


$sent_data['card']=array('number'=>'4242424242424242','exp_year'=>29,'exp_month'=>1,'cvc'=>'123');
//IF YOU HAVE 'secure_vault_token'  then use it instead of card like $sent_data['secure_vault_token']='secure_vault_token'

//F You charge already saved card and customer is not in your checkout page use  $sent_data[‘off_session’]=1

$sent_data['billing_details']=array(
'address_country'=>'',
'address_line1'=>'',
'address_line2'=>'',
'address_city'=>'',
'address_postcode'=>'',
'address_state'=>'',
'email'=>'[email protected]',//REQUIRED TO PROVIDE
'phone'=>'',
'firstname'=>'test ',
'lastname'=>'yyyy x',
);


$sent_data['connection_token']='{connection-token}';//THIS IS IMPORTANT TO IDENTIFY which processor connection you want to use

$gateway_private_key='your_private_key';

            curl_setopt($ch, CURLOPT_URL,'https://api.myuser.com/pay/v1/token');
            curl_setopt($ch, CURLOPT_USERPWD, $gateway_private_key);
            curl_setopt($ch, CURLOPT_POST, 1);
            curl_setopt($ch, CURLOPT_POSTFIELDS, http_build_query($sent_data));
            curl_setopt($ch, CURLOPT_SSL_VERIFYHOST, 0);
            curl_setopt($ch, CURLOPT_SSL_VERIFYPEER, 0);
            curl_setopt($ch, CURLOPT_RETURNTRANSFER, true);
            $response = curl_exec($ch);
            curl_close ($ch);
$response_json=json_decode($response,true);

if($response_json['status']){
  echo'successfully token';//$response_json['token']
	if(isset($response_json['action'])){
		if($response_json['action']['name']=='require_auth'){
			//redirect the customer to $response_json['action']['redirect_url']
		}
	}
}
var request = require('request');

var headers = {
    'Content-Type': 'application/x-www-form-urlencoded'
};

var dataString = "card[number]=4242424242424242&card[exp_year]=22&card[exp_month]=1&card[cvc]=123&risk_session_id=rs_example&amount=1000¤cy=usd&customer_ip=106.235.43.24&billing_details[address_country]=United States-d&billing_details[address_line2]=&billing_details[address_city]=San Francisco&billing_details[address_postcode]=94111&billing_details[address_state]=CA&billing_details[email]=test@example&billing_details[firstname]=Jake&billing_details[lastname]=Musk&'connection_token'=3a1_asdasiqwenqsasodasd";

var options = {
    url: 'https://api.myuser.com/pay/v1/token',
    method: 'POST',
    headers: headers,
    body: dataString,
    auth: {
        'user': 'your_private_key',
        'pass': ''
    }
};

function callback(error, response, body) {
    if (!error && response.statusCode == 200) {
        console.log(body);
				//if body.action is isset check body.action.name =='require_auth' if yes redirect the end user to body.action.redirect_url

    }
}

request(options, callback);
/token endpoint Parameters
| Parameters | Description | Required |
|---|---|---|
| card[number] | Card number that will be tokenized | true |
| card[exp_year] | Card expiration year | true |
| card[exp_month] | Card expiration month | true |
| card[cvc] | Card security code that we will use to send in first transaction related to this card | true |
| amount | amount in cents of your currency. if you want to charge $1, pass 100 | true |
| connection_token | This is to identify which processor to use to obtain the token. You can find connection_token in Myuser dashboard Activate Account section. connection_token you define here must match the connection_token in the frontend otherwise it will not work. | true |
| customer_ip | Ip of the end user | false |
| risk_session_id | You will need to use Javascript to obtain risk session id. You can check it here | true |
| off_session | If you charge already saved card and customer is not in your checkout page send 1, otherwise do not send it. This will mark the charge as merchant-initiated transaction | false |
| customer_user_agent | Browser user agent of the end user. This is required if you are not sending risk session | false |
| secure_vault_token | If you do not send card details, you need to send secure_vault_token that you obtained from Tokenize Endpoint | false |
| paymentMethod | this is a variable you will receive back from 3ds which we will explain in later section and you will need to send it with all other variables | false |
| billing_details[address_country] | Billing country of the end user | true |
| billing_details[address_line1] | Billing street address of the end user | true |
| billing_details[address_line2] | Billing address line 2 of the end user | true |
| billing_details[address_city] | Billing city of the end user | false |
| billing_details[address_postcode] | Billing postalcode of the end user | true |
| billing_details[address_state] | Billing state of the end user | true |
| billing_details[email] | Billing email of the end user | true |
| billing_details[phone] | Billing phone of the end user | false |
| billing_details[firstname] | Billing firstname of the end user | true |
| billing_details[lastname] | Billing lastname of the end user | true |
| shipping_details[address_country] | Shipping country of the end user | true |
| shipping_details[address_line1] | Shipping street address of the end user | true |
| shipping_details[address_line2] | Shipping address line 2 of the end user | true |
| shipping_details[address_city] | Shipping city of the end user | false |
| shipping_details[address_postcode] | Shipping postalcode of the end user | true |
| shipping_details[address_state] | Shipping state of the end user | true |
| shipping_details[email] | Shipping email of the end user | true |
| shipping_details[phone] | Shipping phone of the end user | false |
| shipping_details[firstname] | Shipping firstname of the end user | true |
| shipping_details[lastname] | Shipping lastname of the end user | true |
| 3ds_redirect_back | 3ds call back url 3ds is triggered | false |
Handling 3ds transactions - Direct Method
When /token endpoint returns an error by status being false but also error object has following action->name=='require_auth'. In this case you will need to redirect the end user to error->action->redirect_url and after 3ds operations are done Myuser will redirect the customer back to 3ds_redirect_back you defined on /token request.
Full Example of Direct Integration
This example code is in PHP so please change the code to PHP language
<?php

$ch = curl_init();
$charge_amount=1000;
$charge_currency='usd'; //DEFINE CURRENCY HERE
$sent_data=array(
  'amount'=>$charge_amount,'save'=>true,
'currency'=>$charge_currency, //Currency Passed here and also will be passed in charge function below
'customer_ip'=>127.0. 0.1 //IMPORTANT TO SEND CUSTOMER IP
);

/*
//$sent_data[‘risk_session_id’]’ IS VERY IMPORTANT FOR FRAUD PROTECTION
$sent_data[‘risk_session_id’]=’rs_xxxx’; //you get this from Javascript
Use following javascript code in checkout page to get risk_session_id every time when customer makes a purchase
<script src="https://api.myuser.com/js/checkout.js"></script>

<script type="text/javascript">
var risk_session_id=null;
MyUserPay.setKey('your_public_key');
MyUserPay.createRiskSession(function(data){
if(data.status==1){
risk_session_id=data.id; //send it to us via server request using $sent_data[‘risk_session_id’]
}


 },{'connection_token':’Yourconnection_tokenD',’processor_connection_token’:’default’});
//you can pass ‘default’ instead of 'Yourconnection_tokenD' and Myuser will choose the first available stripe account to create risk sessionf

</script>

*/

$sent_data['card']=array('number'=>'4242424242424242','exp_year'=>29,'exp_month'=>1,'cvc'=>'123');
/IF YOU HAVE ‘secure_vault_token’  then use it instead of card like $sent_data[‘secure_vault_token’]=‘secure_vault_token’  /

/IF You charge already saved card and customer is not in your checkout page use  $sent_data[‘off_session’]=1 /

$sent_data['billing_details']=array(
'address_country'=>'',
'address_line1'=>'',
'address_line2'=>'',
'address_city'=>'',
'address_postcode'=>'',
'address_state'=>'',
'email'=>'[email protected]',//REQUIRED TO PROVIDE
'phone'=>'',
'firstname'=>'test ',
'lastname'=>'yyyy x',
);

//BELOW IS REQUIRED IF YOU SELL TANGIBLE PRODUCTS AND YOUR WEBSITE IN PROCESSOR SHOWS TANGIBLE PRODUCTS
$sent_data['shipping_details']=array(
'address_country'=>'',
'address_line1'=>'',
'address_line2'=>'',
'address_city'=>'',
'address_postcode'=>'',
'address_state'=>'',
'email'=>[email protected]',//REQUIRED TO PROVIDE
'phone'=>'',
'firstname'=>'test ',
'lastname'=>'yyyy x',
);

//$sent_data['connection_token']='{connection-token}';//THIS IS IMPORTANT TO IDENTIFY which processor connection you want to use

$gateway_private_key='your_private_key';

if(isset($_GET['paymentMethod'])){
$sent_data[‘3ds_redirect_back’]=’your3dscallbackurl.com’;
  $sent_data['paymentMethod']=$_GET['paymentMethod'];
//  $sent_data['paymentMethod']  this is for 3ds
/*
if error=true and error_data->action->name=='require_auth'
it means you need to redirect for 3ds, so redirect the URL it gives you but make sure you define 3ds_redirect_back in the beginning so after 3ds are done it redirects back to you
when it redirects back it will give a bunch of GET variables
if error it will look like this:
{'status':0,'error':{'message':result.error.message}}; but in GET array

IF successful it will look like this
status:1
paymentMethod:{LONG ARRAY}

so you need to send exact same request like you did previously to /v1/token but also define  $sent_data['paymentMethod']=$_GET['paymentMethod'];

If it is all the same page you can use example code I sent:
if(isset($_GET['paymentMethod'])){
  $sent_data['paymentMethod']=$_GET['paymentMethod'];
}
*/
}
            curl_setopt($ch, CURLOPT_URL,'https://api.myuser.com/pay/v1/token');
            curl_setopt($ch, CURLOPT_USERPWD, $gateway_private_key);
            curl_setopt($ch, CURLOPT_POST, 1);
            curl_setopt($ch, CURLOPT_POSTFIELDS, http_build_query($sent_data));
            curl_setopt($ch, CURLOPT_SSL_VERIFYHOST, 0);
            curl_setopt($ch, CURLOPT_SSL_VERIFYPEER, 0);
            curl_setopt($ch, CURLOPT_RETURNTRANSFER, true);
            $response = curl_exec($ch);
            curl_close ($ch);
$response_json=json_decode($response,true);

if($response_json['status']){
  echo'successfully token';
  require_once '/MyUserPay/v1/init.php';// OR WHICHEVER FOLDER IT IS FOR YOU
        MyUserPay::setPrivateKey($gateway_private_key);

          $charge = MyUserPay::charge(array(
            'token'=>$response_json['token'],
            "amount"=>$charge_amount,
            'currency'=>$charge_currency,  //currency code passed here as well
            'save'=>true,//save it to customer,
            'metadata'=>array('merchant_website'=>'x.com'),
          ));
        if($charge['status']){
          //success
          var_dump('success');
        }else{
          var_dump('fail:'.$charge['error']['message']);
        }
          var_dump($charge);
}else{
  echo'error:'.$response_json['error']['message'];
}
Inline Integration
There are 3 ways to integrate and obtain Authorization Token. One is a button, and another is inline integration and the last one is Direct Integation. This section will explain inline integration.
Usually, inline integrations should be inside of some form, so you can submit it to the server. Purpose of this integration is token that will be generated from payment information, so you can add it to the form and then send it to your server to process payment.
You need to have one <div></div> element, and with CSS, it should look like all other input fields. Then let's give it some random id called a. Our iframe will be inside of it.
<style type="text/css">
   	#a{margin-bottom: 4px;
    height: 16px;
    padding: 8px;
    border-radius: 2px;
    box-shadow: 0 1px 2px rgba(0,0,0,0.16), 0 1px 2px rgba(0,0,0,0.23);
    border-top: 1px solid #ccc;
   		width: 260px;
   	}
   </style>

<form>

<div id="a"></div>
<button id="example_submit_button"
onclick="
//we will add code here later.
"
>Submit</button>
</form>
Setup Scripts
Now we need to add script tags, set API key, and insert iframe.
<script src="https://api.myuser.com/js/checkout.js"></script>
<script type="text/javascript">
	var style='body{}'; //insert style tag inside of iframe.
	MyUserPay.setKey('your_public_key');
	var element_num = MyUserPay.createElement('#a',{style:style,amount:100});
	//We will use element_num to create token for that specific element
</script>
MyUserPay.createElement(selector,params)
createElement accepts first variable element selector you want to put fields inside, and second variable as object to identify amount you want to authorize and which processor via connection_token you define
| params Parameters | Description | Required |
|---|---|---|
| amount | how much you want to authorize. Amount is in cents | true |
| {'connection_token':'Yourconnection_tokenD'} | This is to identify which processor to use to authorize the charge. You can find connection_token in Myuser dashboard Activate Account section. connection_token you define here must match the connection_token in the backend otherwise it will not work. | false |
Create Token
Now when customer clicks submit button on the form, we need to create the token, and then insert it to the form as an hidden input name MyUserToken.
<button id="example_submit_button"
onclick="

MyUserPay.createElementToken(element_num,function(data){

		if(data.status){
			//success
			//data.token is MyUserToken that you can use to process charges; you need to insert it into this form.
      //then submit the form. Please look at the Charges section to see what to write on the server-side.
		}else{
		  //error
			//you can receive error message using data.error.message, then show it to the user.
		}
	});
"
>Submit</button>
Payment Button
Adding button:
<form   action="your-server-side-code" method="post"  >
 <script
    src="https://api.myuser.com/js/checkout.js"
    class="myuserPay-button"
    data-public_key="your_public_key"
    data-amount="10000"
    data-description="description of item"
    data-name="Item name"
	data-image="Item or your picture,logo"
    data-submit-ajax="1">
 </script>
</form>
Result :
*compile*
<form   action="your-server-side-code" method="post"  >
 <script
    src="https://api.myuser.com/js/checkout.js"
    class="myuserPay-button"
    data-public_key="your_public_key"
    data-amount="10000"
    data-description="description of item"
    data-name="Item name"
    data-image="Item or your picture,logo"
    data-submit-ajax="1">
 </script>
</form>
There are two integration ways. One is a button, and another is inline integration. This section will explain button integration.
Copy html code, and put it into the page that you want to charge your customer. This will insert button inside of the form.
How it works
<form   action="your-server-side-code" method="post"  >
 <div
    class="myuserPay-button"
    data-public_key="your_public_key"
    data-amount="10000"
    data-description="description of item"
    data-name="Item name"
	data-image="Item or your picture,logo"
    data-submit-ajax="1">
 </div>
</form>

<script type="text/javascript" src="https://api.myuser.com/js/checkout.js" ></script>
Using Button Attributes, you can customize what users see as a button text, amount, item image, description when they pay. You can also set email which will be used to inform them about payment, change the behavior of button such as making it *subscription payment, or submitting payment using ajax* instead of loading new page.
Button Attributes
| Attribute | Description |
|---|---|
| data-submit-ajax | If you set this to 1, form will be submitted via ajax, otherwise will be submitted without ajax. |
| class | This should be myuserPay-button. |
| data-public_key | Insert your public key here to authorize. |
| data-amount | It shows how many cents you will charge user. (100 = $1.00). Calculate your currency and convert it into cents. |
| data-amount_string | Setting this attribute will allow you to show custom string to the user when they pay. You can use this function to show users how much in which currency they will be charged. In Payment page it will work like this: Pay {data-amount_string}. E.g., Pay 50 EURO, but user will pay data-amount cents. Make sure they are equal. |
| data-email | This allows you to set email address for customers and should be valid email. MyUser will use this attribute to prevent you from *chargebacks* |
| data-name | This should be the name of your business that customers will recognize. They will see it after they click to pay. |
| data-description | Please write description of product, or if not possible, just general description of user's payment. |
| data-image | Set it to url of image of the product or your business's logo. |
| data-verify | This param should be used when you only want to verify the card instead of charging it. For now, this only accepts "verify_card" string, and then it will verify the card. |
| data-no-button | This will hide the button completely, and will allow you to create your own button. |
You can build your *own button designs, create multiple payment button in one page or let users enter the amount to pay using callbacks* in javascript - MyUserPay Object.
Our javascript library (script tag you called) always gives you MyUserPay Javascript object that you can use to control payment flow, callbacks.
Multiple Buttons
If you need more than one button just add button code multiple times, and then use MyUserPay.render_buttons(); function at the end.
Callbacks
<script type="text/javascript">
MyUserPay.onModalClose(function(form_id,myuserPay_response,user_did){
  if(user_did){
    console.log('user clicked close button and payment windows closed');
  }else{
    console.log('payment window closed because user finished payment successfully');
  }
});


MyUserPay.onPaymentSucceed(function(form_id,MyUserToken){
  //if you add here return false,
  //our API will not submit the form
	//so you can store MyUserToken, and sent it to backend later
});
</script>
To build custom functionality, you can use callbacks as MyUserPay.on{EventName}. form_number argument will be included in each function which represent, in which form event happened.
Here is the list of callbacks you can use:
| Function | Arguments | Description |
|---|---|---|
| MyUserPay.onButtonReady | form_number | This function will be called when button that is connected to form_number is rendered. |
| MyUserPay.onModalClose | form_num, user_did, server_data | This function will be called when modal (Our Payment Screen) is closed. If user_did is true, then the user closed the Modal; otherwise, it closed automatically because the user made a successful purchase. |
| MyUserPay.onPaymentSucceed | form_num, MyUserToken | This function will be called when modal is closed, and we prepare the form data to submit to your server. If you add return false; inside of it, the form will not be submitted. You can take MyUserToken and send it to your backend to collect the payment - if you didn't add return false; we will send it to your backend automatically. |
| MyUserPay.onAjaxSuccess | form_num, your_server_data | This Ajax Request will happen only when you set data-submit-ajax=1 and will be called when request to *your server* is successful. |
| MyUserPay.onAjaxFailed | form_num | This Ajax Request will happen only when you set data-submit-ajax=1 and will be called when request fails due to your server errors. |
Custom Buttons
Example of custom amounts and buttons:
<input class="bluef inputtext" type="text" max="99999999"
name="" placeholder="Enter Amount" onkeyup="
var amount_val = $(this).val();
var max_amount = 99999999;
if(!$.isNumeric(amount_val) && $.trim(amount_val)!='' ){
amount_val=old_typed_money;
$(this).val(old_typed_money);
}
if(parseInt(amount_val)>max_amount){
$(this).val(old_typed_money);
amount_val=old_typed_money;
}
if($.trim(amount_val)==''){
amount_val=0;
}
old_typed_money=amount_val;
MyUser_amountInCents=amount_val*100;
$('.myuserPay-button').attr('data-amount',MyUser_amountInCents);
$('.CustommyuserForm').attr('action','your-server-url'+'?value='+MyUser_amountInCents);
									">
<form action="your-server-url?value=0" class="CustommyuserForm" method="post">
<script src="https://api.myuser.com/js/checkout.js" class="myuserPay-button"
data-public_key="your_public_key" data-amount="0"
data-description="Enter Card Details" data-name="Company Name"
data-submit-ajax="1" data-no-button=true>
									</script>

<div  onclick="myuserPay_openPaymentModal(1);event.preventDefault();"  class="btndiv">
<button class="btnpop">Increase Balance</button></div>
									</form>
You can build your own payment button from scratch with your own rules.
1) Add data-no-button attribute into the element that have myuserPay-button class.
2) Build your button and as an onclick event add myuserPay_openPaymentModal(form_num). form_num should be the number of form; You can see it by just refreshing the page once and looking at HTML code from browser console.
Additionally, if you want to use JSON data to create fields for payment form submission you can use MyUserPay.addFields(JSON_DATA,form_num,{'input_type':'hidden|text'});.
Charges
Charging user, considering form method was post:
$ curl https://api.myuser.com/pay/v1/charges \
  -u your_private_key:
	-d token="exampleTokenasiqwysaysnUAas_1"
	-d amount=10000
	# The colon prevents curl from asking for a password.
<?php
use \MyUser\MyUserPay;
include 'MyUserPay/init.php'; //path/to/MyUserPay library
MyUserPay::setPrivateKey('your_private_key');


$process = MyUserPay::charge(
array(
'amount'=>10000,
//If request was post
'token'=>$_POST['MyUserToken'],
)
);
if($process['status']){
//success
$charge_id = $process['id'];
}else{
//error
echo $process['error']['message'];
}
const myuserpay = require('./myuserpay')('your_private_key');

const res =  myuserpay.charge({
//If request was post, and request.body contains post data
token:request.body.MyUserToken,
amount:10000,
}).then(function (response) {
   if(response.status){
	   //success
     console.log(response.id);
   }else{
	   //error
     console.log(response.error.message);
   }
});
Create a file that your server-side codes will run (the file URL should be the same with *action attribute of form* tag).
Charge Function
Here is charge function params:
| Parameter | type | Description |
|---|---|---|
| token | required | token of the charge that you obtained from one of Create Token methods. |
| amount | required | it shows how much money you want to charge. It should match with front end code. |
| currency | define currency such as usd,eur | false |
| metadata | array of extra information you want to save it with this charge | false |
| save | if you would like to save this card in processor to prevent additional 3ds. You will need to save card_id from response and use it as token in next charge requests. This card id will not work with multiple processor accounts | false |
Response Explanation
Example response from our server for successful charge:
{
  "status": true,
  "id": "ch_84.5730ceeb6d96ea1d1ab0e455eadf3b47",
  "card_id": "card_",
  "currency": "usd",
  "amount": 10000,
  "profit": 9630,
  "profit_in_bonus": 370,
  "paid": true,
  "email": "[email protected]",
  "created": "1552213902",
  "live": false,
  "source": {
		"type":"card",
    "brand": "Visa",
    "country": "US",
    "last4": "4242",
    "exp_month": 4,
    "exp_year": 2042,
    "funding": "credit",
    "cvc_check": "pass"
  }
}
| Parameter | Description |
|---|---|
| status | could be true/false . If it is true, there is no error. |
| id | This shows the ID of the charge, and you can use it to issue refund, or cancel subscription (if it is subscription payment) for this specific charge. |
| card_id | This is id of the card that is being charged. It will return card_id when you do verify_card request, and you will be able to use that card number when you send payment in the future. Soon we will allow you to store card_id to charge them later. |
| currency | in which currency charge is being made. |
| profit_in_bonus | How much bonus points, MyUser helped you to earn. |
| paid | It could be true/false. It could be false when you do subscription charge, and allow user not to pay upfront. |
| live | Request mode; false means test mode. |
| source | source of the charge. This is the object that shows details of the source. |
| source.type | this shows type of the source. E.g. card, paypal, ach. |
| source.funding | If source.type was card, then source.funding represents card type: credit/debit. |
Refunds
Refund:
$ curl https://api.myuser.com/pay/v1/refunds \
  -u your_private_key:
	-d charge="ch_84.5730ceeb6d96ea1d1ab0e455eadf3b47"
<?php
use \MyUser\MyUserPay;
include 'MyUserPay/init.php'; //path/to/MyUserPay library
MyUserPay::setPrivateKey('your_private_key');

//charge_id comes from charge functions.
$charge_id = "ch_84.5730ceeb6d96ea1d1ab0e455eadf3b47";
//if amount is not defined, it will do full refund.
$process = MyUserPay::refund({charge:$charge_id,amount:1000});
if($process['status']){
//success;
}else{
//error
echo $process['error']['message'];
}
const myuserpay = require('./myuserpay')('your_private_key');

//charge_id comes from charge functions.
charge_id = "ch_84.5730ceeb6d96ea1d1ab0e455eadf3b47";
//if amount is not defined, it will do full refund.
const res =  myuserpay.refund({charge:charge_id,amount:1000}).then(function (response) {
   if(response.status){
	   //success
   }else{
	   //error
     console.log(response.error.message);
   }
});
{
  "status": true
}
Doing refund is easy, you just need charge id that got when using charge function, and how much cents you want to refund.
Subscriptions
Currently you will need to save the card and charge it later to be able to do subscriptions
Extras
Request Verifications
Request Verification:
$ curl /webhooks/?action=verify \
  -u your_private_key:
	-d request_id="{request_id}"
<?php
use \MyUser\MyUserPay;
include 'MyUserPay/init.php'; //path/to/MyUserPay library
MyUserPay::setPrivateKey('your_private_key');

$json = file_get_contents('php://input');
$request = json_decode($json, true);

$verify_for='subscription';
$process = MyUserPay::verify_webhook($request['request_id'],$verify_for);

if($process['status']){
//we sent the request
}else{
//some else sent the request
}
const myuserpay = require('./myuserpay')('your_private_key');

var verify_for='subscription';
const res =  myuserpay.verify_webhook({request.body.request_id,verify_for}).then(function (response) {
   if(response.status){
	  //we sent the request
		}else{
		//some else sent the request
		}
});
Example response will be status false or true:
{
  "status": true
}
When we send you webhook (E.g., when subscription fails), you need to make sure that request came from us, if it didn't, you should block it. You can use our library to verify the request easily.